
1.1. Aircraft
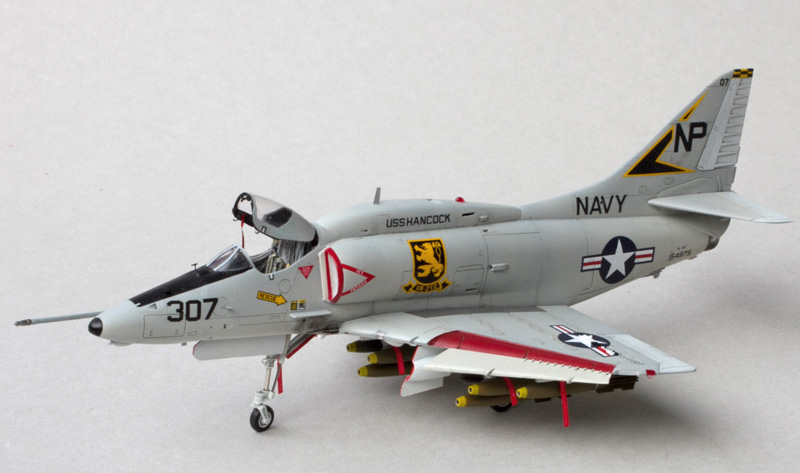
Douglas A-4F Skyhawk
Carrier-based attack aircraft (information in Wikipedia)
U.S. Navy. BuNo 154975 / NP307. VA-212 squadron.
USS Hancock (CV-19), Gulf of Tonkin, 1972.

1.2. Story
An A-4F Skyhawk jet of Attack Squadron 212 aboard the USS Hancock sits fully armed and chained to the flight deck, waiting for the next routine mission of the Vietnam War. The Skyhawk's pilot is having his photograph taken by an obliging flight deck crewman.


1.3. Model Kit
A-4E/F Skyhawk from Fujimi (kit # 25024), 1:72 scale.
2. Kit Overview
The Skyhawk kit by Fujimi is well-known and has been reviewed many times. Although quite old (tooled in the late 1980s), the kit is, in my view, exceptionally good for its age. The accuracy and the quality of moulds are just excellent, and the fine surface details are better than on many newer kits released in the 2000s. The following features of the Fujimi's kit are, for me, especially commendable:
1) Fujimi has correctly modelled one of the most noticeable features of the tiny Skyhawk: the extended leading edge slats. Those leading edge slats are a curious feature of the Skyhawk design. They are entirely automatic and are controlled solely by aerodynamic forces. There are no provisions for the pilot to control these slats in any way; he can neither extend them no retract them. The slats automatically extend (fall down due to gravity) when the airplane slows down for landing, they remain extended on the ground and throughout the takeoff, and then they automatically retract when the airplane reaches a certain airspeed (and the windage overpowers the gravity). Ground crews may manually retract the slats when a particular Skyhawk is undergoing some maintenance, is slotted for a long-time storage or for receiving a paint job. Any scale model that is intended to represent an operational Skyhawk ready for take-off must have the leading edge slats extended.
2) Engine intake interior is included (while many new-tooled kits are still being released without anything in the way of intake trunk interior).
3) Very decent landing gear well interior is included.
Yet, the kit is not perfect: the cockpit interior and the main wheels need replacement, and a number of small details (some of them, in all fairness, being next to impossible to mold in plastic) are lacking which should be scratch-built if your aim is to have an accurately looking Vietnam War era A-4E or F.
3. Construction
3.1. Building

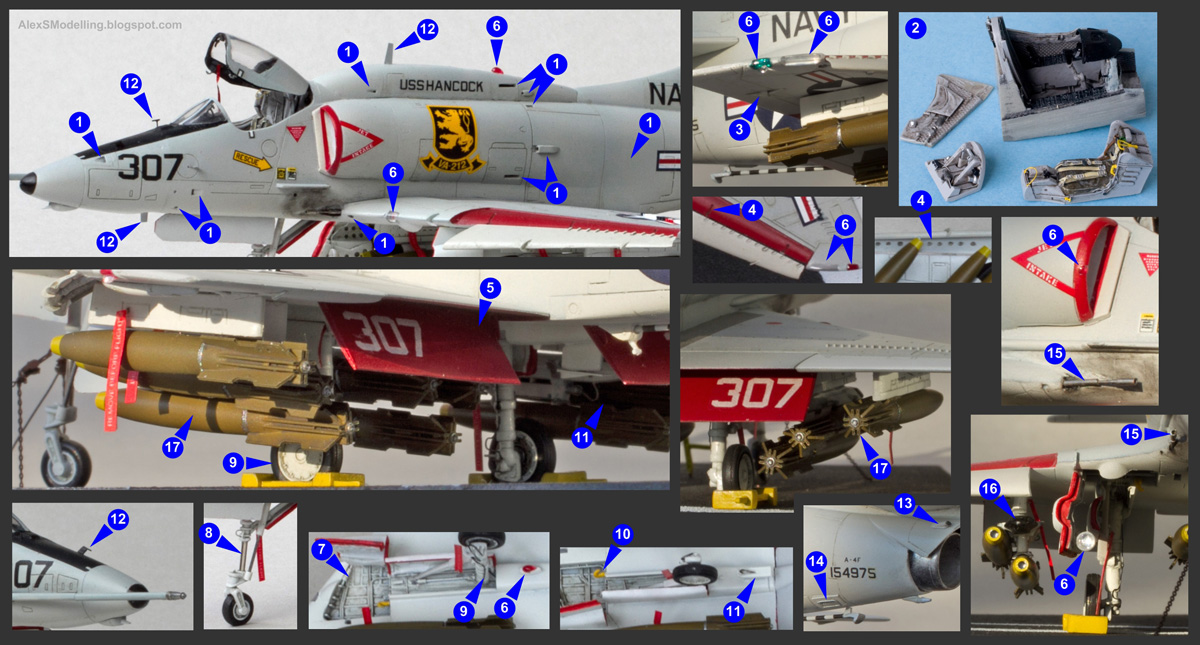
1) Various fuselage inlets and vents were cut out (otherwise they have insufficient depth, in my view). An incorrect vent on the fuselage port side was filled.
2) Amazingly detailed resin cockpit by Aires was installed (set # 7158).
3) Scratch-built actuators added for ailerons and aileron trim tab.
4) The kit's upper wings lack the channels for leading edge slat actuators. I scribed these and also added details to the inner surfaces of wing slats.
5) Wing flaps are positioned as extended, which is very common for operational Skyhawks.
6) The Skyhawk possesses quite a collection of various external lights, and all of those lights had to be scratch-built, including: clusters consisting of three lights on each of the wing tips; approach light in the port wing root; dorsal navigation light; ventral navigation light under the port wing; landing light on the starboard main landing gear door; in-flight refuelling probe illumination light on the starboard air intake lip.
7) Nose and main landing gear well interior enhanced with scratch-built details.
8) Nose landing gear leg enhanced with real metal oleos.
9) Correct main wheels added (Aires set # 7242), as well as some minor details to the main gear legs, e.g. brake lines and tie-down rings.
10) Scratch-built catapult bridle hooks added to main landing gear wells.
11) The small fuel dump pylon under the starboard wing re-positioned (it should stand closer to the flap hinge line than it is on the Fujimi's kit) and enhanced with scratch-built detail.
12) The Pitot tube, angle of attack vane and various blade antennae scratch-built from thin plastic and metal wire.
13) Two AN/ALQ-126 ECM antennae fairings added above the jet exhaust. These antennae were fitted to many Skyhawks deployed to SEA in the later years of the conflict, and historical photographs confirm their presence on the particular aircraft that I am modelling.
14) Flare & chaff dispenser added to the lower port fuselage. Such dispensers were fitted to many Skyhawks deployed to SEA in the later years of the conflict.
15) Gun barrels were scratch-built from thin metal tubes; the kit's plastic ones are hopeless.
16) TER ordnance racks were taken from the Hasegawa's old but decent plastic weapon set # X72-001.
17) Ordnance was added in the form of 9 resin Mk.82 Snakeye bombs manufactured by North Star Models. Such load is confirmed by historical photographs (link).
See my review of Snakeye bomb sets available in 1:72, and avoid the dreadful Snakeye products manufactured by Kora Models.

3.2. Painting & Markings
The painting is relatively straightforward, as the aircraft carriers the standard Light Gull Grey over Insignia White camouflage scheme of the period. Wing flaps interior and undersides, wing leading edge slats interior and landing gear door edges are Insignia Red.
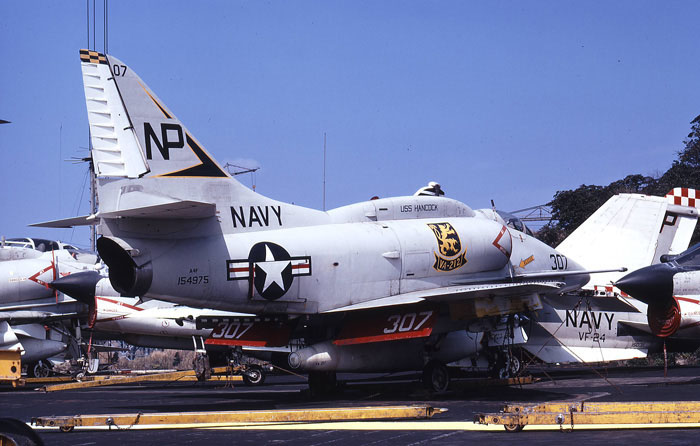
The marking options available in the Fujimi kit – one Royal Australian Navy A-4G, two aggressor variants and one non-combat VC-1 Skyhawk – were of no interest to me. As a prototype for my model I wanted a Vietnam War variant covered by good historical photographs, preferably in color.
Strangely enough, there seems to be no 1:72 scale aftermarket decals currently in production to cover Vietnam War A-4E/F Skyhawks. There used to be quite a few sheets made by MicroScale, but they are all long out of production (and the MicroScale # 72-828 sheet that I fancied could not be found even on eBay). Thankfully, I had surplus decals from an old Italeri A-4F kit (# 181). These old kit decals are quite accurate, but they represent a post-war VA-212 Skyhawk. Historical photographs show that during the 1970-1971 and 1972 deployments to the war zone aboard the USS Hancock, the VA-212 Skyhawks did not have their unit numbers (modex) trimmed in yellow, and neither did they carry the tail code/modex combination painted on the upper starboard wing. Bearing this and a few other minor issues in mind, I have furnished my model to represent the BuNo 154975 from the VA-212's 1972 deployment (see historical photographs here and here).


3.3. Presentation
1) My idea was to present this Skyhawk model without consuming either much shelf space or many crew figures, and yet to make the vignette as "alive" as possible. I used this historical photograph as an inspiration. On my vignette a Skyhawk pilot is being photographed by a deck crewman in front of his combat-loaded airplane before a mission, a common enough practice.
2) A scene like this needed a pilot and a flight deck crewman figure. My figures came from the sets by Italeri (# 1246) and Hasegawa (# X72-7) and underwent some customization. In particular, the crewman's attire and headgear were changed so that they would be historically correct for the period, his arms were re-positioned for holding the camera, and the camera itself was scratch-built.
3) The deck is sheet plastic, and photo-etched tie-down eyes came from an excellent set # 7209 by White Ensign Models.
4) Any aircraft parked on the flight deck must be secured to the said deck. This is a very strictly followed rule: if there is no pilot (or crewman) in the cockpit to operate the brakes, the aircraft is always tied down. During the Vietnam War era chains were the means to secure aircraft to the deck (see historical photo), and I used photo-etched chains from the same White Ensign Models set mentioned above.
5) Conspicuous "Remove Before Flight" tags to mark items like various safety pins have already been in use by the Navy when the SEA conflict began, therefore my model has such tags attached where appropriate in accordance with historical photographs. No fuses are present on my Snakeyes (the fuses are often not inserted until immediately before an aircraft taxies to launch), therefore no RBF flags are present on the bombs.
6) The Skyhawk was one of the very few Navy airplanes lacking the self-boarding capability. Therefore, external access ladders were always needed for the crew to get to their cockpits. The ladder on my vignette is a small photo-etched item produced by F4Models (# 7014).
2) Amazingly detailed resin cockpit by Aires was installed (set # 7158).
3) Scratch-built actuators added for ailerons and aileron trim tab.
4) The kit's upper wings lack the channels for leading edge slat actuators. I scribed these and also added details to the inner surfaces of wing slats.
5) Wing flaps are positioned as extended, which is very common for operational Skyhawks.
6) The Skyhawk possesses quite a collection of various external lights, and all of those lights had to be scratch-built, including: clusters consisting of three lights on each of the wing tips; approach light in the port wing root; dorsal navigation light; ventral navigation light under the port wing; landing light on the starboard main landing gear door; in-flight refuelling probe illumination light on the starboard air intake lip.
7) Nose and main landing gear well interior enhanced with scratch-built details.
8) Nose landing gear leg enhanced with real metal oleos.
9) Correct main wheels added (Aires set # 7242), as well as some minor details to the main gear legs, e.g. brake lines and tie-down rings.
10) Scratch-built catapult bridle hooks added to main landing gear wells.
11) The small fuel dump pylon under the starboard wing re-positioned (it should stand closer to the flap hinge line than it is on the Fujimi's kit) and enhanced with scratch-built detail.
12) The Pitot tube, angle of attack vane and various blade antennae scratch-built from thin plastic and metal wire.
13) Two AN/ALQ-126 ECM antennae fairings added above the jet exhaust. These antennae were fitted to many Skyhawks deployed to SEA in the later years of the conflict, and historical photographs confirm their presence on the particular aircraft that I am modelling.
14) Flare & chaff dispenser added to the lower port fuselage. Such dispensers were fitted to many Skyhawks deployed to SEA in the later years of the conflict.
15) Gun barrels were scratch-built from thin metal tubes; the kit's plastic ones are hopeless.
16) TER ordnance racks were taken from the Hasegawa's old but decent plastic weapon set # X72-001.
17) Ordnance was added in the form of 9 resin Mk.82 Snakeye bombs manufactured by North Star Models. Such load is confirmed by historical photographs (link).
See my review of Snakeye bomb sets available in 1:72, and avoid the dreadful Snakeye products manufactured by Kora Models.
3.2. Painting & Markings
The painting is relatively straightforward, as the aircraft carriers the standard Light Gull Grey over Insignia White camouflage scheme of the period. Wing flaps interior and undersides, wing leading edge slats interior and landing gear door edges are Insignia Red.
The marking options available in the Fujimi kit – one Royal Australian Navy A-4G, two aggressor variants and one non-combat VC-1 Skyhawk – were of no interest to me. As a prototype for my model I wanted a Vietnam War variant covered by good historical photographs, preferably in color.
Strangely enough, there seems to be no 1:72 scale aftermarket decals currently in production to cover Vietnam War A-4E/F Skyhawks. There used to be quite a few sheets made by MicroScale, but they are all long out of production (and the MicroScale # 72-828 sheet that I fancied could not be found even on eBay). Thankfully, I had surplus decals from an old Italeri A-4F kit (# 181). These old kit decals are quite accurate, but they represent a post-war VA-212 Skyhawk. Historical photographs show that during the 1970-1971 and 1972 deployments to the war zone aboard the USS Hancock, the VA-212 Skyhawks did not have their unit numbers (modex) trimmed in yellow, and neither did they carry the tail code/modex combination painted on the upper starboard wing. Bearing this and a few other minor issues in mind, I have furnished my model to represent the BuNo 154975 from the VA-212's 1972 deployment (see historical photographs here and here).


3.3. Presentation
1) My idea was to present this Skyhawk model without consuming either much shelf space or many crew figures, and yet to make the vignette as "alive" as possible. I used this historical photograph as an inspiration. On my vignette a Skyhawk pilot is being photographed by a deck crewman in front of his combat-loaded airplane before a mission, a common enough practice.
2) A scene like this needed a pilot and a flight deck crewman figure. My figures came from the sets by Italeri (# 1246) and Hasegawa (# X72-7) and underwent some customization. In particular, the crewman's attire and headgear were changed so that they would be historically correct for the period, his arms were re-positioned for holding the camera, and the camera itself was scratch-built.
3) The deck is sheet plastic, and photo-etched tie-down eyes came from an excellent set # 7209 by White Ensign Models.
4) Any aircraft parked on the flight deck must be secured to the said deck. This is a very strictly followed rule: if there is no pilot (or crewman) in the cockpit to operate the brakes, the aircraft is always tied down. During the Vietnam War era chains were the means to secure aircraft to the deck (see historical photo), and I used photo-etched chains from the same White Ensign Models set mentioned above.
5) Conspicuous "Remove Before Flight" tags to mark items like various safety pins have already been in use by the Navy when the SEA conflict began, therefore my model has such tags attached where appropriate in accordance with historical photographs. No fuses are present on my Snakeyes (the fuses are often not inserted until immediately before an aircraft taxies to launch), therefore no RBF flags are present on the bombs.
6) The Skyhawk was one of the very few Navy airplanes lacking the self-boarding capability. Therefore, external access ladders were always needed for the crew to get to their cockpits. The ladder on my vignette is a small photo-etched item produced by F4Models (# 7014).

4. Reference Data
[1] Basic information on the A-4 Skyhawk in Wikipedia: link
[2] U.S. Navy and Marine Corps A-4 Skyhawk Units of the Vietnam War | Combat Aircraft Series # 69 | Osprey Publishing Ltd., 2007.
[3] Douglas A-4E/F Skyhawk in Navy Service| Naval Fighters Series # 51 | Ginter Books, 2001.
[4] A-4 Skyhawk Walk Around | Walk Around Series # 41 | Squadron/Signal Publications, 2006.
[5] A-4 Skyhawk in Detail & Scale | In Detail & Scale Series # 32 | Airlife Publishing Inc., 1989.
[6] An excellent web site dedicated to the A-4 Skyhawk: link
5. Notes
As I keep saying, for your painting & marking reference always shun the photographs of museum airplanes and ignore the kit manufacturer's instructions. Only historical photographs are your true friend. For example, there have been at least four different variations of applying the red jet intake chevrons on the A-4E/F, and you will never know which is the right one for your particular BuNo and time period unless you have a clear historical photograph. The same is true for the multitude of other markings and stenciling. Compare photographs that show two A-4Fs from the same squadron – BuNo 155019 and BuNo 154973 – and see for yourself.