1.1. Aircraft
Vought F5U-1N
Hypothetical operational fighter variant of an experimental aircraft of unconventional design (information in Wikipedia)
U.S. Marine Corps. VMF(N)-513 squadron.
Republic of Korea, 1950..51.

1.2. Story
The hypothesis behind my model (and attendant diorama) is as follows. Let us suppose that the XF5U-1 did manage to make its first flight in early 1947, before the project cancellation directive from the Navy, and its performance was sufficiently promising for the Navy to place a small order with Vought. The testing was hastened, the teething problems were addressed, and the weirdly-shaped little airplane went into serial production as the F5U-1 day- and F5U-1N night-fighter. By that time the Navy was convinced that it didn't need its escort carriers (whose shorter flight decks the F5U was intended for) anymore and was more interested in jets, but the excellent STOL characteristics of the F5U have made it appealing to the Marines, who were supposed to be able to operate from rough and inevitably short airstrips near their landing beaches. Thus (just as it was in real life with other aircraft types ordered but not really wanted by the Navy) the whole batch of produced F5Us was handed over to the Marine Corps Aviation. Once there, some found their way into the night fighter squadron 513 (VMF(N)-513), which was already operating a mix of different types, and then went on to serve in the Korean War.
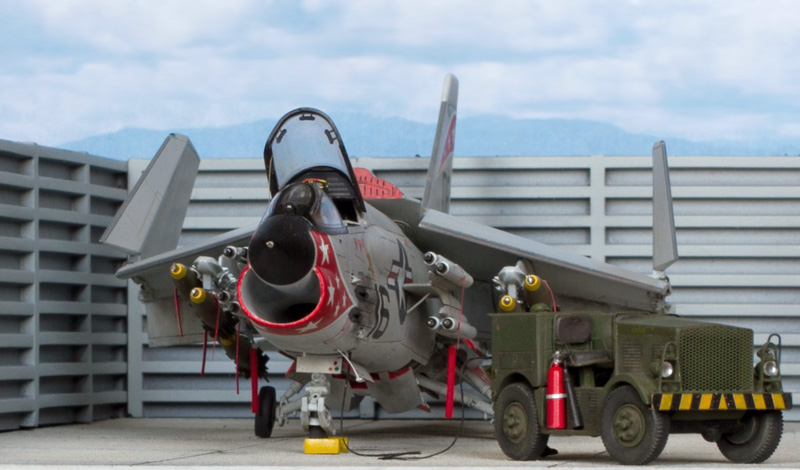
My small diorama shows a VMF(N)-513 machine waiting for some maintenance on a field base somewhere in the Republic of Korea.

1.3. Model Kit
XF5U-1 from Hasegawa (kit # 51563 / SP63), 1:72 scale.
2. Kit Overview
My detailed review of this kit is available here.
3. Construction
3.1. Building


The enhancements that I have added to what was in the box can be divided into three categories. Firstly, we have to improve upon the minor shortcomings of the kit and to add some of the details that can be seen on the existing photographs of the XF5U-1:
1) The kit's landing gear wells are too shallow: the wheels do not fit inside. Therefore all three wheel wells were deepened.
2) Landing gear legs got better detailing: oleos, brake lines (thin wire), scissor links and tie-down rings (photo-etched metal).
3) Main wheels hubs were replaced with custom-made PE metal item for better accuracy.
4) Engine cooling air exit flaps, scratch-built from metal foil, are modelled in the open position.
5) Prominent balance weights on the elevons (which Vought called "ailavators") were scratch-built, as the kit's items are too thick scale-wise.
6) Scratch-built elevon trim tab hinges and actuators from thin metal replaced the kit't overly thick items.
7) Ventral wire aerial was imitated, as usual, with stretched plastic.
8) Clear external lights added, including:
a) Clear white dorsal, ventral and rear navigation lights.
b) Red and green navigation lights on the port and starboard elevons.
c) Circular blue formation lights on both elevons, upper and lower sides.
Secondly, some guesswork is inevitably required to detail those areas for which no historical photographs are available:
9) A number of "guessworked" details were added to the landing gear well interior, including the landing gear door actuators.
10) I have fashioned the cockpit interior using some "quotes" from another Vought product – the F4U-5N Corsair. As for the instrument panel, I have designed it basing on the drawings from source [2], and had it custom-made in photo-etched metal.
Lastly, I've made a number of modification to make the model look like a hypothetical operational fighter:
11) Scratch-built pilot ejection seat was added to the cockpit; its design was inspired by the Vought ejection seat installed in their F6U-1 Pirate (see more on my rationale in the Notes section).
12) Vought's initial design provided for a fixed armament of either six 12.7mm machine guns or four 20mm guns. Considering the armament of the Navy's other front-line fighters of the period, the operational F5U would have certainly had the 20mm cannons, not the machine guns. I have installed the barrels made of thin syringe tubes, but – being in deep recesses – they are not visible on the finished model.
13) Obviously, a gunsight was also needed. I have scratch-built one, again taking the F4U-5N Corsair as a reference.
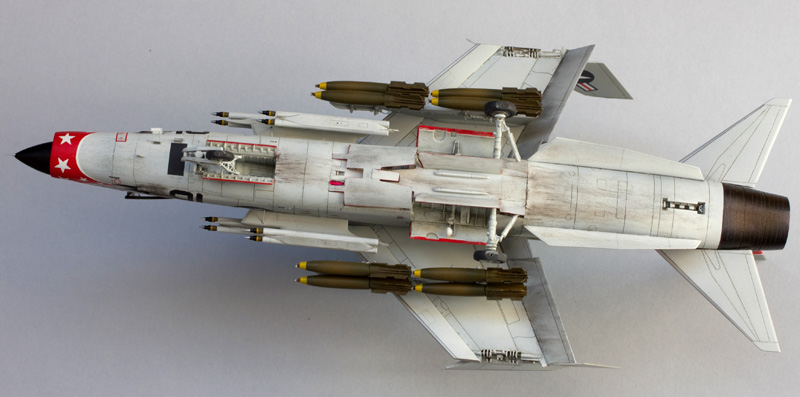
14) Vought's design provided for two hard points under the central fuselage. I decided that my model will carry one standard 150 gallon external fuel tank. The basic plastic parts were "donated" by the ancient Bearcat kit from Novo, and then some scratch-built details were added to make the tank more accurate.
15) Another hard point on my model is occupied by the AN/APS-4 radar pod (see more on my rationale in the Notes section). This item I had to create from scratch.
16) I don't think that the clear nose cone, seen on the XF5U-1 prototype, is functional; it does not make much sense on an operational fighter. So I had it painted over, with clear windows left for the landing light and the gun camera that were housed under the nose cone according to sources [2] & [3].

This is the first model where I have, mostly for the sake of amusement, counted all of the parts. Here is the result:
- The Hasegawa kit contained 75 parts, of which I have used 45.
- 6 photo-etched metal items were custom-made for this model.
- Another 57 parts were obtained from my box of spares; this mostly included various small items from surplus photo-etched metal detail sets, but also some unused plastic parts from my old model kits.
- Conversely, only 2 parts from ready-made aftermarket sets have found their way into this model (clear navigation lights).
- Finally, a total of 186 parts were entirely scratch-made, using plastic, metal wire, metal foil and paper.
This gives the grand total of 296.


3.2. Painting & Markings
The camouflage scheme is straightforward: for the period, it is Sea Blue overall. However, as we do not know how the various internal areas of a hypothetical operational F5U would have been painted, I decided to use its stablemate, the Vought F4U-5 Corsair, as an analogy: these birds would have been is service during more or less the same timeframe. Therefore, on my model,
- Instrument panel and side consoles are flat black.
- Cockpit interior (including the area beneath the canopy), landing gear well interior and landing gear door inner sides are Interior Green.
- Landing gear legs and wheel hubs are Sea Blue.
Photographs of VMF(N)-513 F4U-5Ns helped me to define the set of markings and their fonts. But considering the F5U's unconventional shape, the placement of markings is, of course, different. In this case, a much later Vought F7U-3 Cutlass could serve as a partial analogy: just as the F5U, it did not have anything in the way of aft fuselage sides, and so the service name and the squadron designation went onto the vertical stabilizers below the tail codes, while the Bureau number and aircraft type text block was put onto the forward fuselage.
All of my markings decals were custom-printed, while the national insignia decals came from a generic decal sheet produced by Techmod.
3.3. Presentation
1) My small diorama is intended to replicate a fragment of the pierced-steel planking (PSP) airfield surface, typical for the U.S. air bases in the Republic of Korea. The base came from Eduard and was trimmed a little bit.
2) I have added several ground support equipment items, the presence of which on the Marine Corps air bases in the theater is confirmed by historical photographs. These include a manually operated maintenance crane, a maintenance platform, wheel chocks, a tool box and a fire extinguisher. The fire extinguisher comes from Aires/AeroBonus (set #720013); the rest of the items I have designed myself and had them custom-made in photo-etched metal.
3) The ground crewmen figures came from Hasegawa (set #X72-6) and Matchbox (from their old P-70 kit).

4. Reference Data
[1] Basic information on the XF5U in Wikipedia: link
[2] Chance-Vought V-173 and XF5U-1 Flying Pancakes | Naval Fighters Series # 21 | Ginter Books, 1992
[3] XF5U-1 Illustrated Assembly Breakdown | Chance Vought Aircraft, 1945
[4] I do not pretend to author the idea of giving a hypothetical operational F5U to the Marines of the VMF(N)-513: this model build article has served as an inspiration.
5. Notes
5.1. The XF5U-1 had a conventional pilot seat, and that was acceptable for a prototype. For an operational F5U, however, an ejection seat would have been a must: given the F5U's peculiar shape, the pilot would have had practically no chance to survive a conventional egress in an emergency. In the late 1940s, many aircraft manufacturers worked on their own variants of ejection seats (here's a reminder: the first ever aircraft equipped with an ejection seat, the Heinkel He 280, flew in September 1940, and the first operational aircraft to have an ejection seat, the Heinkel He 219, entered service in 1943), and Vought was no exception: their F6U Pirate jet fighter, first flown in October 1946, had a Vought-designed ejection seat. I hypothesized that the operational F5U, as it would have been in development during the same timeframe as the Pirate, would have had a similar ejection seat.
5.2. Since the later half of the World War II and until the mid-1950s the externally mounted AN/APS-4 radar pod was seen on many Naval aircraft types. These include F6F-3E and -5E Hellcat; TBM-3 Avenger (-3E, -3N, -3Q, -3S variants); SB2C-3..-5 Helldiver; SC-1 Seahawk; AM-1 Mauler and AD-1...4 Skyraider. Obviously, this radar pod was very adaptable, and it was in considerable demand in the years before the widespread adoption of internally mounted radars. There are also enough photographs to confirm that the AN/APS-4 was used operationally on the AD Skyraider during the Korean War. Therefore, I saw no reason why my hypothetical operational F5U-1N couldn't be equipped with this radar pod.
Interestingly, on many aircraft of the types I am listing above the radar pods were white, even though the airframes themselves were Sea Blue overall. On my model I am replicating this painting curiosity as well.
When building my model, I had hopes to source the radar pod from some of the old kits in my possession. This didn't work, though: while two of my old kits – the Airfix SB2C Helldiver and the Ace AM-1 Mauler – did have the pod, both of the items in question were oversized. Thus I had to resort to scratch-building.
5.3. Just as most aircraft do, the weird-shaped Vought F5U has a collection of external lights: the navigation lights, the position / formation lights and the landing light. And, as it is customary with practically all aircraft kits in the 1:72 scale, the model kit manufacturer provides no clear parts to imitate the said lights. For a long time, the "common wisdom" of scale aircraft modelling has been to paint the respective areas of the plastic parts clear red or clear green over silver and leave it at that. But to me, this approach is unsatisfactory: whatever the paint color, a solid piece of plastic will never be a realistic imitation of transparent plexiglas cap that covers a lighting fixture. Therefore, I always try to take the trouble to scratch-build (or source, if appropriate aftermarket items can be found) the transparent shapes to imitate the lights. I think that this small selection of photo fragments of my previous models gives a decent proof that it's worth the effort.

U.S. Marine Corps. VMF(N)-513 squadron.
Republic of Korea, 1950..51.

1.2. Story
The hypothesis behind my model (and attendant diorama) is as follows. Let us suppose that the XF5U-1 did manage to make its first flight in early 1947, before the project cancellation directive from the Navy, and its performance was sufficiently promising for the Navy to place a small order with Vought. The testing was hastened, the teething problems were addressed, and the weirdly-shaped little airplane went into serial production as the F5U-1 day- and F5U-1N night-fighter. By that time the Navy was convinced that it didn't need its escort carriers (whose shorter flight decks the F5U was intended for) anymore and was more interested in jets, but the excellent STOL characteristics of the F5U have made it appealing to the Marines, who were supposed to be able to operate from rough and inevitably short airstrips near their landing beaches. Thus (just as it was in real life with other aircraft types ordered but not really wanted by the Navy) the whole batch of produced F5Us was handed over to the Marine Corps Aviation. Once there, some found their way into the night fighter squadron 513 (VMF(N)-513), which was already operating a mix of different types, and then went on to serve in the Korean War.
My small diorama shows a VMF(N)-513 machine waiting for some maintenance on a field base somewhere in the Republic of Korea.

1.3. Model Kit
XF5U-1 from Hasegawa (kit # 51563 / SP63), 1:72 scale.
2. Kit Overview
My detailed review of this kit is available here.
3. Construction
3.1. Building


1) The kit's landing gear wells are too shallow: the wheels do not fit inside. Therefore all three wheel wells were deepened.
2) Landing gear legs got better detailing: oleos, brake lines (thin wire), scissor links and tie-down rings (photo-etched metal).
3) Main wheels hubs were replaced with custom-made PE metal item for better accuracy.
4) Engine cooling air exit flaps, scratch-built from metal foil, are modelled in the open position.
5) Prominent balance weights on the elevons (which Vought called "ailavators") were scratch-built, as the kit's items are too thick scale-wise.
6) Scratch-built elevon trim tab hinges and actuators from thin metal replaced the kit't overly thick items.
7) Ventral wire aerial was imitated, as usual, with stretched plastic.
8) Clear external lights added, including:
a) Clear white dorsal, ventral and rear navigation lights.
b) Red and green navigation lights on the port and starboard elevons.
c) Circular blue formation lights on both elevons, upper and lower sides.
Secondly, some guesswork is inevitably required to detail those areas for which no historical photographs are available:
9) A number of "guessworked" details were added to the landing gear well interior, including the landing gear door actuators.
10) I have fashioned the cockpit interior using some "quotes" from another Vought product – the F4U-5N Corsair. As for the instrument panel, I have designed it basing on the drawings from source [2], and had it custom-made in photo-etched metal.
Lastly, I've made a number of modification to make the model look like a hypothetical operational fighter:
11) Scratch-built pilot ejection seat was added to the cockpit; its design was inspired by the Vought ejection seat installed in their F6U-1 Pirate (see more on my rationale in the Notes section).
12) Vought's initial design provided for a fixed armament of either six 12.7mm machine guns or four 20mm guns. Considering the armament of the Navy's other front-line fighters of the period, the operational F5U would have certainly had the 20mm cannons, not the machine guns. I have installed the barrels made of thin syringe tubes, but – being in deep recesses – they are not visible on the finished model.
13) Obviously, a gunsight was also needed. I have scratch-built one, again taking the F4U-5N Corsair as a reference.
14) Vought's design provided for two hard points under the central fuselage. I decided that my model will carry one standard 150 gallon external fuel tank. The basic plastic parts were "donated" by the ancient Bearcat kit from Novo, and then some scratch-built details were added to make the tank more accurate.
15) Another hard point on my model is occupied by the AN/APS-4 radar pod (see more on my rationale in the Notes section). This item I had to create from scratch.
16) I don't think that the clear nose cone, seen on the XF5U-1 prototype, is functional; it does not make much sense on an operational fighter. So I had it painted over, with clear windows left for the landing light and the gun camera that were housed under the nose cone according to sources [2] & [3].

This is the first model where I have, mostly for the sake of amusement, counted all of the parts. Here is the result:
- The Hasegawa kit contained 75 parts, of which I have used 45.
- 6 photo-etched metal items were custom-made for this model.
- Another 57 parts were obtained from my box of spares; this mostly included various small items from surplus photo-etched metal detail sets, but also some unused plastic parts from my old model kits.
- Conversely, only 2 parts from ready-made aftermarket sets have found their way into this model (clear navigation lights).
- Finally, a total of 186 parts were entirely scratch-made, using plastic, metal wire, metal foil and paper.
This gives the grand total of 296.


The camouflage scheme is straightforward: for the period, it is Sea Blue overall. However, as we do not know how the various internal areas of a hypothetical operational F5U would have been painted, I decided to use its stablemate, the Vought F4U-5 Corsair, as an analogy: these birds would have been is service during more or less the same timeframe. Therefore, on my model,
- Instrument panel and side consoles are flat black.
- Cockpit interior (including the area beneath the canopy), landing gear well interior and landing gear door inner sides are Interior Green.
- Landing gear legs and wheel hubs are Sea Blue.
Photographs of VMF(N)-513 F4U-5Ns helped me to define the set of markings and their fonts. But considering the F5U's unconventional shape, the placement of markings is, of course, different. In this case, a much later Vought F7U-3 Cutlass could serve as a partial analogy: just as the F5U, it did not have anything in the way of aft fuselage sides, and so the service name and the squadron designation went onto the vertical stabilizers below the tail codes, while the Bureau number and aircraft type text block was put onto the forward fuselage.
All of my markings decals were custom-printed, while the national insignia decals came from a generic decal sheet produced by Techmod.
3.3. Presentation
1) My small diorama is intended to replicate a fragment of the pierced-steel planking (PSP) airfield surface, typical for the U.S. air bases in the Republic of Korea. The base came from Eduard and was trimmed a little bit.
2) I have added several ground support equipment items, the presence of which on the Marine Corps air bases in the theater is confirmed by historical photographs. These include a manually operated maintenance crane, a maintenance platform, wheel chocks, a tool box and a fire extinguisher. The fire extinguisher comes from Aires/AeroBonus (set #720013); the rest of the items I have designed myself and had them custom-made in photo-etched metal.
3) The ground crewmen figures came from Hasegawa (set #X72-6) and Matchbox (from their old P-70 kit).

4. Reference Data
[1] Basic information on the XF5U in Wikipedia: link
[2] Chance-Vought V-173 and XF5U-1 Flying Pancakes | Naval Fighters Series # 21 | Ginter Books, 1992
[3] XF5U-1 Illustrated Assembly Breakdown | Chance Vought Aircraft, 1945
[4] I do not pretend to author the idea of giving a hypothetical operational F5U to the Marines of the VMF(N)-513: this model build article has served as an inspiration.
5. Notes
5.1. The XF5U-1 had a conventional pilot seat, and that was acceptable for a prototype. For an operational F5U, however, an ejection seat would have been a must: given the F5U's peculiar shape, the pilot would have had practically no chance to survive a conventional egress in an emergency. In the late 1940s, many aircraft manufacturers worked on their own variants of ejection seats (here's a reminder: the first ever aircraft equipped with an ejection seat, the Heinkel He 280, flew in September 1940, and the first operational aircraft to have an ejection seat, the Heinkel He 219, entered service in 1943), and Vought was no exception: their F6U Pirate jet fighter, first flown in October 1946, had a Vought-designed ejection seat. I hypothesized that the operational F5U, as it would have been in development during the same timeframe as the Pirate, would have had a similar ejection seat.
5.2. Since the later half of the World War II and until the mid-1950s the externally mounted AN/APS-4 radar pod was seen on many Naval aircraft types. These include F6F-3E and -5E Hellcat; TBM-3 Avenger (-3E, -3N, -3Q, -3S variants); SB2C-3..-5 Helldiver; SC-1 Seahawk; AM-1 Mauler and AD-1...4 Skyraider. Obviously, this radar pod was very adaptable, and it was in considerable demand in the years before the widespread adoption of internally mounted radars. There are also enough photographs to confirm that the AN/APS-4 was used operationally on the AD Skyraider during the Korean War. Therefore, I saw no reason why my hypothetical operational F5U-1N couldn't be equipped with this radar pod.
Interestingly, on many aircraft of the types I am listing above the radar pods were white, even though the airframes themselves were Sea Blue overall. On my model I am replicating this painting curiosity as well.
When building my model, I had hopes to source the radar pod from some of the old kits in my possession. This didn't work, though: while two of my old kits – the Airfix SB2C Helldiver and the Ace AM-1 Mauler – did have the pod, both of the items in question were oversized. Thus I had to resort to scratch-building.
5.3. Just as most aircraft do, the weird-shaped Vought F5U has a collection of external lights: the navigation lights, the position / formation lights and the landing light. And, as it is customary with practically all aircraft kits in the 1:72 scale, the model kit manufacturer provides no clear parts to imitate the said lights. For a long time, the "common wisdom" of scale aircraft modelling has been to paint the respective areas of the plastic parts clear red or clear green over silver and leave it at that. But to me, this approach is unsatisfactory: whatever the paint color, a solid piece of plastic will never be a realistic imitation of transparent plexiglas cap that covers a lighting fixture. Therefore, I always try to take the trouble to scratch-build (or source, if appropriate aftermarket items can be found) the transparent shapes to imitate the lights. I think that this small selection of photo fragments of my previous models gives a decent proof that it's worth the effort.

5.4. It is very sad to see how Hasegawa is virtually abandoning the segment of aircraft model kits. Once, Hasegawa was a byword for quality and finesse. Their aircraft kits were prized and treasured, and many have held the distinction of being "the very best of" a given subject for many years.
Quality is still present in their kits, but there does not seem to be any progress. Their newest kits do not offer any visible improvement in terms of detail, finesse and engineering over those dating from the 1980s or the 1990s. Other manufacturers (from such diverse countries as Czechia, Poland, UK, PRC, Russia, Ukraine) are now way ahead of Hasegawa.
And quantities decline too: during the last two decades, since 2000 till 2020, Hasegawa has released just 16 new tooled 1:72 scale aircraft kits, whereas Airfix, for instance, has released 61 during the same period.
These days Hasegawa regularly releases cars, fantasy/anime subjects and female figures – presumably, to cater for their local market. When it comes to aircraft kits, what we mostly see are just re-releases of some of their old kits with new decals.