
1.1. Aircraft
Vought F-8E Crusader
Carrier-based fighter / fighter-bomber (information in Wikipedia)
U.S. Marine Corps. BuNo 149196 / DB16. VMF(AW)-235 squadron.
Da Nang, Republic of Vietnam, 1967.

1.2. Story
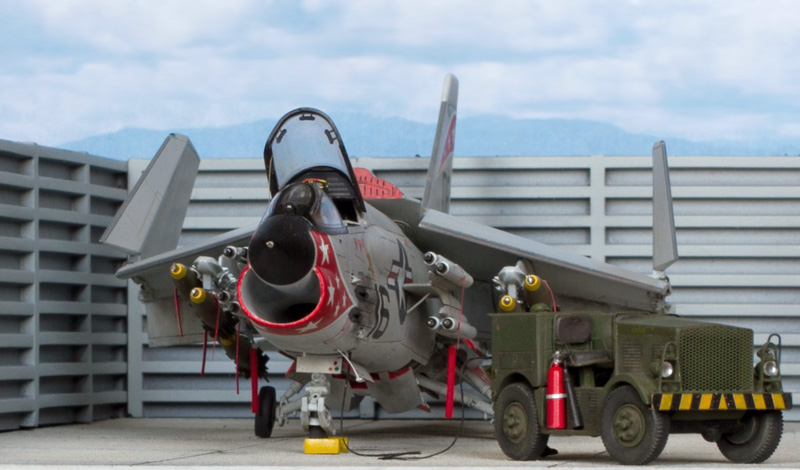
An F-8E Crusader of the U.S. Marines squadron VMF(AW)-235 sits in a revetment at Da Nang airbase, Republic of Vietnam. The ground crew, operating the mobile electrical power unit and the compressed air engine starter, prepare the plane for the next routine close air support mission of the war.


1.3. Model Kit
F-8E Crusader from Academy (kit # 1615), 1:72 scale.
2. Kit Overview
The F-8E Crusader kit by Academy from Korea is well-known and has been reviewed many times. In my view, it is an excellent kit. Its key features include:
- Very good overall accuracy.
- Exceptional quality of moulds.
- Smooth external surfaces with delicate recessed panel lines.
- Very good level of detail out-of-the-box, including things that not many manufacturers will give you in this scale (intake trunk; decent details inside the cockpit and landing gear wells; provision for raised variable incidence wing and extended leading edge slats).
- Clever engineering of parts which have their positions and angles pre-defined by convenient tabs and respective recesses.
- Accurate decal for both of the provided variants, which is a rare occurrence with out-of-the-box decals.
The only noticeable accuracy problem of the Academy's kit is the windscreen center section being a bit too wide. Alas, this cannot be corrected.
3. Construction
3.1. Building


 This is the list of enhancements that I have added to what was in the box.
First, there's the matter of configuration:
1) The Crusader's variable angle of incidence wing is a unique feature: there's no other plane like this. So it must be showcased. The Academy's kit has a provision for placing the wing in the raised position; but if you follow the instruction manual you will have the wing rotated along an entirely wrong axis. To get the matters right, a relatively easy correction is required: the innermost edge of the flaps must be moved further from the fuselage. I have also detailed the area of the fuselage that becomes visible when the wing is in the raised position.
2) When the Crusader's wing is in the raised position, the leading edge slats on both the inner and the outer sections droop. The kit gives you these slats as separate parts, but to accurately show the slats as extended you must modify the plastic parts.
3) Whenever a Crusader has been parked for some time, both the ailerons and the flaps typically fall down – you can see it on the majority of historical photographs. Deflected ailerons and flaps were imitated with reference to such photographs.
4) Historical photographs indicate that Marine Corps Crusaders, when parked in revetments, had their wings folded to save space. As I intended to present my model in a typical SEA revetment, I cut the wing and imitated the wingfold mechanism details. But whether you fold the outer wing panels or not, the plastic bumps on the upper side of the wing at the fold line must be removed: they are one of the very few inaccuracies of the Academy's kit.
 Then, to get an accurately looking F-8E you have to add a number of details – either simply too small to be molded in plastic, or just omitted in the kit:
5) Cockpit interior was detailed with the photo-etched metal set produced Eduard from Czech Republic (set #73227). This is a very useful set, but be aware that the angled gunsight screen, provided both in the Eduard's detail set and in the kit, must not be installed: it was not present on the E-model Crusader.
6) Area immediately behind the cockpit, visible when the canopy is raised, was enriched with some scratch-built detail.
7) Landing gear wells, doors and legs are quite nice out of the box. Nevertheless, the aforementioned Eduard's set gives even more useful details there, such as tie-down rings, scissor links, brake lines and door actuators. The highly visible nose landing gear leg received a scratch-built oleo made from a common nail.
8) An indentation for the catapult bridle attachment is omitted in the kit and had to be scratch-built.
9) Most of the fuselage vents are beautifully molded in the Academy's plastic. The only one that must be corrected is the large exhaust on the starboard side in front of the wing: the kit gives you two smaller vents, while the F-8E has a single slightly slanted vent.
10) Afterburner cooler air intakes were replaced with resin aftermarket items produced by Quickboost (set #72107).
11) Pitot tube was replaced with a finer one, a metal aftermarket item produced by Master-Model from Poland (set #72049).
12) The Crusader possesses quite a collection of external lights which requires attention:
a) two navigation lights on each of the wing tips (scratch-built);
b) red fuselage anti-collision lights, dorsal and ventral (kit items);
c) clear circular navigation lights on both sides of the vertical stabilizer (scratch);
d) landing light on the port main landing gear door (scratch);
e) carrier approach lights cluster on the nose landing gear door (scratch);
f) red in-flight refueling probe illumination light, starboard side beneath the canopy (scratch);
g) rectangular orange-colored formation lights, two on each side of the fuselage (decals).
13) My intention was to position the canopy open, and that meant that the cockpit steps must be extended. There are three in total, all scratch-built.
14) Since I intended to present my airplane as being prepared for a mission, the doors for external power socket and engine starter receptacle had to be cut out and positioned open.
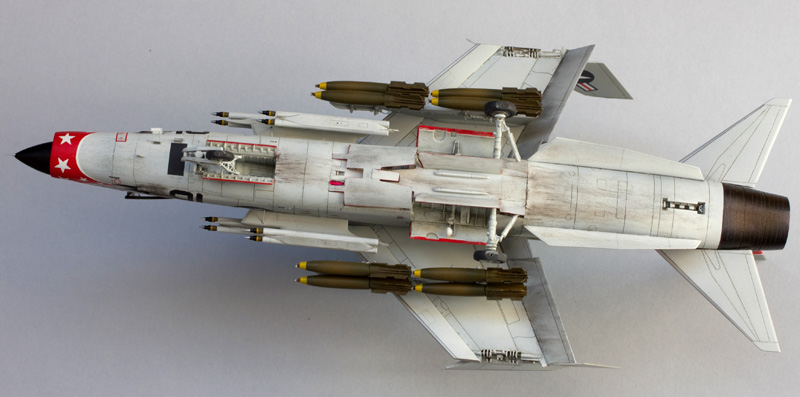
15) The kit's weapon pylons are good, but do not forget to add small braces to the fuselage Y-pylons (typically quite hard to notice, but visible on this photograph).
 Finally, there's the weapon load:
16) The kit's twin Zuni rocket launchers are good, but I replaced the rocket heads with the more accurate ones taken from the Eduard's resin set #672211. The separate heads are easier to paint, too.
17) I used the kit's MER ordnance racks and added some bits of scratch-built details.
18) The two MERs were loaded with 8 Mk.82 Snakeye bombs. These exquisitely detailed resin items are manufactured by North Star Models: see my review of Snakeye bomb sets available in the 1:72 scale, and avoid the horrible Snakeye sets from the manufacturer Kora.
19) Historical photographs indicate that, during their SEA service, Marine Crusaders stood "on alert" with bomb fuses and rocket warheads in place. In such situations the conspicuous "Remove Before Flight" tags on each item of ordnance are necessary.


3.2. Painting & Markings
It would seem that the U.S. Navy's standard camouflage scheme of the period, the Light Gull Grey over Insignia White, is something not very difficult to achieve. That is true, but there are many small items on the real F-8E that are not of the base color and should not be overlooked.
This is a short list of painting particulars for "my" BuNo 149196 (asterisks mark statements that may not be true for all Crusaders; for any other BuNo / time period you should carry out your own research):
- Aluminum: wing slat leading edges, horizontal stabilizer and vertical stabilizer leading edges, pitot tube.
- Insignia Red: landing gear door edges; speed brake inner side; *wing center section's forward bulkhead.
- Insignia White: landing gear wells; speed brake well; interior details visible when the wing is in the raised position and when the outer wing panels are folded; *topmost part of the vertical stabilizer leading edge.
- Flat black: *radome; *anti-glare panel; *windshield framing; *areas around gun apertures.
- Bare metal (titanium): *engine exhaust nozzle; *fuselage area immediately beside the horizontal stabilizer.
- Dark grey: *antenna panel, bottom forward fuselage; *horizontal stabilizer walkways.
The VMF(AW)-235 colorful unit markings are from Microscale decal #7286 that was obtained a long time ago for this very purpose. In my case, the sheet was crumbling. Foreseeing this, I covered it with a coat of Tamiya varnish, and in the end this 30+-year old decal went very well. On the other hand, the Academy's decal was an unpleasant surprise: it is as stiff as the Scotch tape, does not conform to curved surfaces, does not react to Microset / Microsol liquids. Only very small items from this decal sheet could be used, such as some technical stenciling.
3.3. Presentation
1) My small diorama is intended to replicate a fragment of the pre-fabricated corrugated metal revetment that was such a typical feature of American airbases during the war in South East Asia. The diorama base is sheet plastic, painted to imitate the ubiquitous concrete field. The revetment walls are resin items produced by a small British company called USAFLine (set #72-601), and the earth filler is imitated by using something as trivial as coffee.
U.S. Marine Corps. BuNo 149196 / DB16. VMF(AW)-235 squadron.
Da Nang, Republic of Vietnam, 1967.

1.2. Story
An F-8E Crusader of the U.S. Marines squadron VMF(AW)-235 sits in a revetment at Da Nang airbase, Republic of Vietnam. The ground crew, operating the mobile electrical power unit and the compressed air engine starter, prepare the plane for the next routine close air support mission of the war.


F-8E Crusader from Academy (kit # 1615), 1:72 scale.
2. Kit Overview
The F-8E Crusader kit by Academy from Korea is well-known and has been reviewed many times. In my view, it is an excellent kit. Its key features include:
- Very good overall accuracy.
- Exceptional quality of moulds.
- Smooth external surfaces with delicate recessed panel lines.
- Very good level of detail out-of-the-box, including things that not many manufacturers will give you in this scale (intake trunk; decent details inside the cockpit and landing gear wells; provision for raised variable incidence wing and extended leading edge slats).
- Clever engineering of parts which have their positions and angles pre-defined by convenient tabs and respective recesses.
- Accurate decal for both of the provided variants, which is a rare occurrence with out-of-the-box decals.
The only noticeable accuracy problem of the Academy's kit is the windscreen center section being a bit too wide. Alas, this cannot be corrected.
3. Construction
3.1. Building


First, there's the matter of configuration:
1) The Crusader's variable angle of incidence wing is a unique feature: there's no other plane like this. So it must be showcased. The Academy's kit has a provision for placing the wing in the raised position; but if you follow the instruction manual you will have the wing rotated along an entirely wrong axis. To get the matters right, a relatively easy correction is required: the innermost edge of the flaps must be moved further from the fuselage. I have also detailed the area of the fuselage that becomes visible when the wing is in the raised position.
2) When the Crusader's wing is in the raised position, the leading edge slats on both the inner and the outer sections droop. The kit gives you these slats as separate parts, but to accurately show the slats as extended you must modify the plastic parts.
3) Whenever a Crusader has been parked for some time, both the ailerons and the flaps typically fall down – you can see it on the majority of historical photographs. Deflected ailerons and flaps were imitated with reference to such photographs.
4) Historical photographs indicate that Marine Corps Crusaders, when parked in revetments, had their wings folded to save space. As I intended to present my model in a typical SEA revetment, I cut the wing and imitated the wingfold mechanism details. But whether you fold the outer wing panels or not, the plastic bumps on the upper side of the wing at the fold line must be removed: they are one of the very few inaccuracies of the Academy's kit.

5) Cockpit interior was detailed with the photo-etched metal set produced Eduard from Czech Republic (set #73227). This is a very useful set, but be aware that the angled gunsight screen, provided both in the Eduard's detail set and in the kit, must not be installed: it was not present on the E-model Crusader.
6) Area immediately behind the cockpit, visible when the canopy is raised, was enriched with some scratch-built detail.
7) Landing gear wells, doors and legs are quite nice out of the box. Nevertheless, the aforementioned Eduard's set gives even more useful details there, such as tie-down rings, scissor links, brake lines and door actuators. The highly visible nose landing gear leg received a scratch-built oleo made from a common nail.
8) An indentation for the catapult bridle attachment is omitted in the kit and had to be scratch-built.
9) Most of the fuselage vents are beautifully molded in the Academy's plastic. The only one that must be corrected is the large exhaust on the starboard side in front of the wing: the kit gives you two smaller vents, while the F-8E has a single slightly slanted vent.
10) Afterburner cooler air intakes were replaced with resin aftermarket items produced by Quickboost (set #72107).
11) Pitot tube was replaced with a finer one, a metal aftermarket item produced by Master-Model from Poland (set #72049).
12) The Crusader possesses quite a collection of external lights which requires attention:
a) two navigation lights on each of the wing tips (scratch-built);
b) red fuselage anti-collision lights, dorsal and ventral (kit items);
c) clear circular navigation lights on both sides of the vertical stabilizer (scratch);
d) landing light on the port main landing gear door (scratch);
e) carrier approach lights cluster on the nose landing gear door (scratch);
f) red in-flight refueling probe illumination light, starboard side beneath the canopy (scratch);
g) rectangular orange-colored formation lights, two on each side of the fuselage (decals).
13) My intention was to position the canopy open, and that meant that the cockpit steps must be extended. There are three in total, all scratch-built.
14) Since I intended to present my airplane as being prepared for a mission, the doors for external power socket and engine starter receptacle had to be cut out and positioned open.
15) The kit's weapon pylons are good, but do not forget to add small braces to the fuselage Y-pylons (typically quite hard to notice, but visible on this photograph).

16) The kit's twin Zuni rocket launchers are good, but I replaced the rocket heads with the more accurate ones taken from the Eduard's resin set #672211. The separate heads are easier to paint, too.
17) I used the kit's MER ordnance racks and added some bits of scratch-built details.
18) The two MERs were loaded with 8 Mk.82 Snakeye bombs. These exquisitely detailed resin items are manufactured by North Star Models: see my review of Snakeye bomb sets available in the 1:72 scale, and avoid the horrible Snakeye sets from the manufacturer Kora.
19) Historical photographs indicate that, during their SEA service, Marine Crusaders stood "on alert" with bomb fuses and rocket warheads in place. In such situations the conspicuous "Remove Before Flight" tags on each item of ordnance are necessary.


3.2. Painting & Markings
It would seem that the U.S. Navy's standard camouflage scheme of the period, the Light Gull Grey over Insignia White, is something not very difficult to achieve. That is true, but there are many small items on the real F-8E that are not of the base color and should not be overlooked.
This is a short list of painting particulars for "my" BuNo 149196 (asterisks mark statements that may not be true for all Crusaders; for any other BuNo / time period you should carry out your own research):
- Aluminum: wing slat leading edges, horizontal stabilizer and vertical stabilizer leading edges, pitot tube.
- Insignia Red: landing gear door edges; speed brake inner side; *wing center section's forward bulkhead.
- Insignia White: landing gear wells; speed brake well; interior details visible when the wing is in the raised position and when the outer wing panels are folded; *topmost part of the vertical stabilizer leading edge.
- Flat black: *radome; *anti-glare panel; *windshield framing; *areas around gun apertures.
- Bare metal (titanium): *engine exhaust nozzle; *fuselage area immediately beside the horizontal stabilizer.
- Dark grey: *antenna panel, bottom forward fuselage; *horizontal stabilizer walkways.
The VMF(AW)-235 colorful unit markings are from Microscale decal #7286 that was obtained a long time ago for this very purpose. In my case, the sheet was crumbling. Foreseeing this, I covered it with a coat of Tamiya varnish, and in the end this 30+-year old decal went very well. On the other hand, the Academy's decal was an unpleasant surprise: it is as stiff as the Scotch tape, does not conform to curved surfaces, does not react to Microset / Microsol liquids. Only very small items from this decal sheet could be used, such as some technical stenciling.
3.3. Presentation
1) My small diorama is intended to replicate a fragment of the pre-fabricated corrugated metal revetment that was such a typical feature of American airbases during the war in South East Asia. The diorama base is sheet plastic, painted to imitate the ubiquitous concrete field. The revetment walls are resin items produced by a small British company called USAFLine (set #72-601), and the earth filler is imitated by using something as trivial as coffee.
2) External electric power for pre-flight purposes comes from the NC-5A mobile power unit, a purpose-built land-based vehicle in wide use by the U.S. Navy and Marine Corps from the mid-1950s until the mid-1970s. The kit is produced by F4Models (cat. # 7024). Although yellow is a more common color for the ground support equipment, available historical photos from Da Nang and other SEA airbases indicate that some variety did exist. In accordance with these photos, my NC-5A is painted Field Green and the Douglas air-start unit is Sea Blue.
3) Compressed air for starting the jet engine is provided by the Douglas air-start unit. This is also a kit made by F4Models (cat. # 7019).
3) Compressed air for starting the jet engine is provided by the Douglas air-start unit. This is also a kit made by F4Models (cat. # 7019).
4) Two ground crewmen are busy with the GSE. The figures came from Hasegawa #X72-7 and Italeri #1246 sets with some custom modifications (in fact, I had to make some resin copies first, as the original Italeri figures, while being very good shape-wise, are made from some horrible polyethylene substance which is unworkable from the modelling perspective).


4. Reference Data
[1] Basic information on the F-8 Crusader in Wikipedia: link
[2] Vought F-8 Crusader in Action | Aircraft in Action Series # 70 | Squadron/Signal Publications, 1985.
[3] F-8 Crusader Walk Around | Walk Around Series # 38 | Squadron/Signal Publications, 2005.
[4] F-8D, F-8E Aircraft NATOPS Flight Manual | Naval Air Systems Command, 1964-1968.
[5] Vought F-8 Crusader Part 1 | Naval Fighters Series # 16 | Ginter Books, 1988.
5. Notes
5.1. Some may say that my rendering of the revetment area looks too tidy. Did I get lazy? No. In fact, I have analyzed dozens of historical photographs of the Da Nang airbase, and of the Marine Corps aircraft revetments therein. These photographs prove that inside the revetments with the operational aircraft there was normally no surplus equipment or tools, nor any other paraphernalia. Arguably, visual clutter such as extra tools and equipment makes an aviation diorama more alive, but in this case I had to adhere to the historic truth, not to a cliché.
5.2. For this model, I have also purchased a Multiple Ejector Rack (MER) set #672119 produced by Eduard. Regrettably, it has turned out that the Eduard's rendering of the MER cannot be used: it appears to be undersized, and the Mk.82 bombs simply do not fit under it in tandem, as they are supposed to do. I am visualizing this on my comparison picture, with the Academy's kit part and an item from the weapon set by Hasegawa (#35001) shown alongside.

PS: Lamentably, your typical reviewers (those of the "My sincere thanks to ABC Company for this review sample" persuasion) like to swoon over details and frequently overlook not only the accuracy but even the size (the scale) of the models or items that they are reviewing. There are several reviews of thus MER set on the Internet, and all seem to be parroting the tired "Highly recommended!" mantra without any attempt to analyze the accuracy