18 March 2016

F2H-2P Banshee - Sword Model Kit Review

1. Introduction
Aircraft: McDonnell F2H-2P Banshee
Model kit manufacturer / country: Sword / Czech Republic
Scale: 1:72
Catalogue number: 72078
Release time: 2014

Basic information on the F2H Banshee is available in Wikipedia (link) and will not be repeated here.

2. Kit
2.1. Box
The box is a typical side-opener, of moderate size (25 x 17.5 x 4 cm) and of soft cardboard (therefore, not particularly sturdy).

2.2. Instruction
Instruction is printed in on three black & white A4 sheets. Guidance on building and painting is clear enough. A typical review writer will lament the lack of references to model paint numbers and corresponding FS codes, but I believe that this is a type of information that modellers ought to obtain from a reliable source beforehand.

2.3. Plastic, Resin and Photoetched Parts
This is a true multimedia kit. In addition to plastic parts you get a number of resin items and a set of pre-painted photoetched parts.
The quality of molding is very good, all exterior surfaces are smooth with thin panel lines. Resin items are very nicely cast. The quality of etching is superb.
But quality is one thing, while accuracy is quite another. And in this area the kit leaves much to be desired:
1) Unfortunately, the distinctive shape of the camera nose is not accurate in the kit. On a real F2H-2P there are pronounced "eyebrows" above the camera apertures, the tip of the nose is slightly more pointed and more rectangular (rather than roundish) in cross-section.
2) Engine exhaust shroud shape is inaccurate in the kit. Refer to my comparison pictures. The round bulge of the engine shroud must stand more proud above the wing surface.
3) The wing root fairing between the engine exhaust shroud and the fuselage is less than accurate in the kit. On a real Banshee the fairing is longer.
4) The camera bay interior on a real F2H-2P is much more intricate than the plastic parts offered in the kit. Furthermore, those parts give the appearance that no less than 9 cameras are present, whereas a real photo-Banshee was not designed to carry more than 6 cameras.
5) The proportions of the nose wheel in relation to its tyre are slightly off in the kit. There is no imitation of the ribbed rim. The tyre lacks tread pattern.
6) Resin main wheels provided in the kit are not exactly accurate, as the central part of the hub should be flat and not bulged inwards (see my comparison pictures) Furthermore, the tyres lack tread pattern.
7) The F2H has a rather distinctive tail bumper. Respective part is present in the kit; however, the instruction manual tells you to glue it onto the entirely wrong place on the fuselage. As always, historical photographs are the only thing to trust.
8) The fuel dump tube on a real Banshee is rather prominent. It is omitted in the kit.
9) Alas, as it is customary with practically all kits in the 1:72 scale, there are no clear parts to imitate navigation lights, landing light and position lights. Incidentally, the Sword guys themselves have already broken this trend with their F9F-8P Cougar and T-28C Trojan kits where clear navigation lights are present.
 

To be objective, a number of high points of the kit must also be noted, in particular:
10) The kit includes resin cast seamless intake channels. This is a most welcome part, and sadly absent in many other good kits.
11)  Resin items to detail engine nozzles are provided (turbine blades and center body).
12) The cockpit has excellent detail straight out of the box. A nicely detailed resin ejection seat, finely painted photo-etched dashboard, side consoles and seatbelts are especially worth mentioning
13) Some items are provided to detail the space below the sliding canopy, and that is an extremely rare occurrence in this scale.
14) The kit's canopy is given as two separate parts and thus can be positioned open, which is excellent.
15) The whole nose section is provided in clear plastic. This is a very clever idea, as masking is much easier than gluing 9 small clear pieces into small holes.
16) Very good out-of-the-box detail is provided for the landing gear legs and landing gear wells (modellers should note that main landing gear doors are always closed on a stationary Banhsee).

The instruction manual suggests to install a pair of outer wing pylons. Indeed, specifications state that the F2H-2P had provisions for a pair of underwing flash cartridge pods for night photography. However, among all available historical photographs of the recce Banshees I was unable to find any to confirm that either of the machines covered by the decal options has in fact carried the pylons.

3. Decal
There are 2 decal options provided:
A) USMC. BuNo 125687 / MW3. VMJ-1, Pohang (K-3), Korea, 1952.
B) U.S. Navy. BuNo 128863 / PP28. VC-61, USS Yorktown (CV-10), 1953-54.

Unfortunately, as it is often the case with out of the box decals, there are many inaccuracies.
Variant A:
1) The branch of service name above the BuNo lettering is inaccurate on the decal. It must read "MARINES", not "NAVY". Proportions are also wrong: the branch of service letters must be 50% as tall as the BuNo.
2) Font for the "MW" tail code is inaccurate on the decal. Observe the difference in "M" on the decal and on historical photographs.
3) Font for the "MARINES" lettering is inaccurate on the decal. Observe the difference in "M", "A", "R", "S" on the decal and on historical photographs.

Variant B:
4) Font for the wing "NAVY" lettering is inaccurate on the decal. Observe the difference in "A" on the decal and on historical photographs.
5) Font for the fuselage "NAVY" lettering is inaccurate on the decal. Observe the difference in "A" and in spacing on the decal and on historical photographs.
6) Font for the "PP" tail code is inaccurate on the decal. Note how thick the P's are on historical photographs in relation to what we see on the decal sheet.
7) Proportions of lettering of the BuNo block are wrong on the decal: the branch of service letters must be 50% as tall as the BuNo.
8) Most of the VC-61 Banshees, including BuNo 128863, had their modex repeated on the rudder. Respective item is missing on the decal sheet.
9) Some of the VC-61 Banshees, including BuNo 128863, had their BuNo repeated on the wingtip tanks. Respective item is missing on the decal sheet.

4. Alternatives & Aftermarket
For a very long time there was only one F2H-2P Banshee model in the 1:72 scale available on the market, the one from Airfix. For a kit released in 1980, it was very good; from today's viewpoint it is rather obsolete. Somewhere around 2010 the Banshee was tackled by Olimp Pro Resin who released full resin kits of the F2H-2 and F2H-2N variants. At some point they have announced the recce variant as well, but then have seemingly backed off.

There aren't many aftermarket items applicable for either variant of the F2H-2. As far as I can see there is only this:
1) Vacu-formed canopy that comes inside the set # 4 manufactured by Falcon.
2) Vacu-formed canopy from Squadron Products (# 9111).

5. Conclusion
Pro:
 - Very good quality of molding, smooth surface, fine panel lines.
 - Very good out-of-the box detail, including cockpit, landing gear, intake channels and exhaust detail.
 - Fair price (~$17 at Hannants).
Contra:
 - Significant inaccuracies in shape and geometry, including: camera nose shape; engine exhaust shroud shape; main and nose wheel hub shape.
 - Inaccurate decal.

The Sword's kit is surely an improvement over the old one from Airfix. However, Sword must do something about accuracy on the corporate level. I have bought their Banshee, Skyknight and Seastar kits, and each turned out to have a whole cluster of avoidable inaccuracies. These kits are new tools released in the 2010s, and they all represent subjects for which a lot of information is available (including historical photographs, detailed books and preserved aircraft accessible for measurements). This information must be used rather than ignored.

6. Reference Data
[1] FH Phantom / F2H Banshee in Action | Aircraft in Action Series # 182 | Squadron/Signal Publications, 2002
[2] Early Banshees | Naval Fighters Series # 73 | Ginter Books, 2006
[3] McDonnell Banshee | Naval Fighters Series # 2 | Ginter Books, 1980
[4] Basic information on the F2H Banshee in Wikipedia: link
[5] An excellent photo walk-around: link
As usual, one has to be careful when looking at photo walk-arounds of museum exhibits. Frequently, painting and markings on such exhibits are historically inaccurate.

6 March 2016

F3D-2 Skyknight - Sword Model Kit Review

1. Introduction
Aircraft: Douglas F3D-2 Skyknight
Model kit manufacturer / country: Sword / Czech Republic
Scale: 1:72
Catalogue number: 72074
Release time: 2013

Basic information on the F3D-2 Skyknight is available in Wikipedia (link) and will not be repeated here.

2. Kit
2.1. Box
The box is a typical awkward side-opener, of moderate size (30 x 20 x 4 cm) and of soft cardboard (therefore, not particularly sturdy).

2.2. Instruction
Instruction is printed in on three black & white A4 sheets. Guidance on building and painting is clear enough. A typical review writer will lament the lack of references to model paint numbers and corresponding FS codes, but I believe that he who lacks this type of information should first obtain it from a reliable source and only then start thinking about building an accurate model kit.

2.3. Plastic Parts
There is no way around it. What we get in this box is NOT a model of the U.S. Navy / U.S. Marine Corps F3D-2 operational night fighter. It is a model of a one-of-kind testbed operated by Raytheon for the U.S. Army to conduct some electronics tests (several airframes were passed to Raytheon, including BuNo 124598, 124630, 125807, 127043 and 127074).

This scale model kit was released in 2013. The Internet is here, with options to search for information and to order books at your fingertips. How on Earth Sword came to ignore more than a hundred historical photographs and at least two good books (Squadron Signal's and Steve Ginter's) that clearly explain the very few variations that the Skyknight has actually came in?... How blind one should be to close one's eyes on hundreds of historical photographs and instead pick a one-of-kind testbed as a basis for manufacturing a scale model kit?

Coming to the point. The Sword kit's port and starboard fuselage halves possess prominent bulges that should not be there at all. Those bulges are instrumentation fairings; they belong to the Raytheon's test airframes and must not be present on operational Skyknights. Sure, a modeller can (and must) sand those fairings off. But this will take time and effort (no, this is not "very easy", as some of the reviewers suggest), and would ruin the delicate panel lines. The fact in itself is extremely disappointing.
Here are some historical photographs that show the "clean" fuselage valid for all operational Skyknights (including EF-10B): linklink, link.
And here is a photograph of a preserved ex-Raytheon BuNo 124630 with fake markings and the offending fairing in place: link.

A number of other issues should be listed:
1) The shape of engine air intakes on a real Skyknight is very intricate. It is simplified in the kit, and sanding will be required in some very awkward places. Fences that run between the fuselage and intake channels on a real aircraft have to be scratch-built as they are not present in the kit.
2) On a real Skyknight, the way the forward part of the canopy is integrated with the fuselage is very intricate. This area is inaccurate in the kit, as the clearly seen arched joint lines between the fuselage and the canopy of the real aircraft are not discernible in the kit.
3) Troughs for port and starboard pairs of guns are too close together in the kit.
4) The kit's cockpit interior is austere. This is unfortunate, as on a real Skyknight quite a lot of the cockpit is clearly seen through the bulbous canopy, including dashboard, pilots seats and canopy structure beams. On the one hand, some well-respected manufacturers (Hasegawa, for instance) continue producing model kits with practically no interior details to speak of. On the other hand, Sword themselves has recently released kits with excellent out-of-the-box interior which includes multiple resin and photoetched parts – these are their F2H-2 Banshee and T2V-1 Seastar products.
5) The wheels are accurate, but the tyres sadly lack tread pattern.
6) Wheel bay interior and landing gear door interior details are present but much simplified – see walk-around, reference [4].
7) Flap hinges are missing, whereas on a real aircraft they are very prominent (two per flap).
8) Small juts on ailerons outboard from trim tabs are missing.
9) Rudder hinge line has no depth at all; it is not so on a real Skyknight.
10) Horizontal stabilizer trim tab actuators are missing.
11) Raised rectangular panels are present on the horizontal stabilizer which are not found on operational Skyknights (another legacy of copying a Raytheon testbed, I presume).
12) The way to glue the wings to the fuselage that the manual suggests is simply unworkable. The resulting joint will no doubt be fragile. It would be advisable to devise and install metal reinforcing rods.

2.4. Clear Items
The kit's canopy is designed to be assembled from three parts, which requires some care. The forward edge of the canopy does not align well with the respective bulges on the fuselage, but it is just as well since the said bulges are themselves not entirely accurate.
Alas, as it is customary with practically all kits in the 1:72 scale, there are no clear parts to imitate wingtip navigation lights and position lights. Incidentally, Sword has already broken this trend with their F9F-8P Cougar and T-28C Trojan kits where clear navigation lights are present.

3. Decal
There are 5 decal options provided:
A) USMC. BuNo 124620 / WF15. VMF(N)-513, Pyeongtaek (K-6), Korea, 1953.
B) USMC. BuNo unknown / WF23. VMF(N)-513, Korea, 1953.
C) USMC. BuNo 124615 / WF8. VMF(N)-513, Pyeongtaek (K-6), Korea, 1955.
D) U.S. Navy. BuNo 127022 / NA603. VC-4, USS Franklin D. Roosevelt (CV-42), 1952.
E) U.S. Navy. BuNo 127072 / T402. VF-14, USS Intrepid (CV-11), 1954.

Surprisingly, the accuracy of decals is slightly better than average.
Variant A:
1) Decals for this variant appear to be accurate. There's just one thing: do not heed the instruction manual and do not apply the wing code and modex to the top starboard wing. All available historical photographs of VMF(N)-513 Skynights show that the top starboard wing as well as the bottom port wing are devoid of any markings.
2) A note regarding all VMF(N)-513 Skynights: careful research is required to ensure that the size of the national insignia is appropriate for the BuNo that you are modelling. The stars and bars of at least two different sizes can be seen on the squadron's aircraft.

Variant B:
I could only find one historical photograph of the WF23 in supposedly red markings: it is black & white, grainy, and only a part of the aircraft is actually visible. To me this means that there is simply not enough information to attempt modelling this particular aircraft, regardless of its MiG Killer status. Period.

Variant C:
I could only find one historical photograph of the WF8. Only part of the aircraft is visible, and there is no indication that it's BuNo is 124615. Same verdict as for Variant B.

Variant D:
3) "603" modex for the top starboard wing is too small on the decal. According to a historical photograph of BuNo 127022 the wing modex is as tall as 70% of the wing "NA" code letters, whereas on the decal it is only 58%.
4) Small "603" modex that according to a historical photograph is present on drop tanks is actually included on the decal but not mentioned in the instruction manual.

Variant E:
5) Decal for the wing code reads "ATG", whereas historical photograph shows that only the "T" was actually present on the top starboard wing. Otherwise decals for this variant appear to be accurate.

4. Alternatives & Aftermarket
For a very long time there was only one F3D Skyknight model in the 1:72 scale available on the market, the one from Matchbox (# PK-134). For a kit released in 1988, it was very good; from today's viewpoint it has only nostalgic value. One aftermarket item existed: a vacu-formed canopy that comes inside the set # 4 manufactured by Falcon.

The appearance of the Sword's modern kit has brought us some more aftermarket. As of March 2016, the list is as follows:

1) Resin cockpit from Pavla (# 72124). Note that although this set contains excellent detail for everything that is below the windowsill, no items are provided to detail the canopy structure which is highly visible on real Skyknights.

2) Small photoetched detail set from RES-IM / Eduard (# 72030) that contains very useful pre-painted instrument panels.

3) Resin air brake set from Pavla (# 72166). Modellers should remember that air brakes are designed to be used when an aircraft is airborne. Air brakes were never left open on a stationary operational F3D-2 aircraft. This piece of aftermarket does not remedy any of the kit's shortcomings but will only result in more kits being built in a historically inaccurate configuration.

4) Aftermarket decal from PrintScale (# 72087). Even a very brief glance on this decal shows the U.S. national insignia that are bright blue instead of Insignia Blue, plus a set of absolutely inaccurate letters and digits for the VMCJ-1 variant (just look at how the "5" and the "RM" appear on the Print Scale's decal and then look at historical photographs - like this one - of some real VMCJ-1 EF-10Bs). This is only fit for a waste basket.
It is curios to see how PrintScale, after producing dozens of decals for different U.S. Navy / Marines subjects through several years, makes the same mistakes with every new decal. Their USN / USMC subject decals invariably use historically inaccurate fonts, with letters and digits apparently taken from some standardized ready-made font / typeface, in many cases considerably different from what all of us can see on perfectly available historical photographs.

5. Conclusion
Pro:
 - Very good quality of molding, smooth surface, very fine panel lines.
 - Decal with unusually few inaccuracies.
 - Fair price (~$16 at the manufacturer's site).
Contra:
 - A number of noticeable inaccuracies, including: canopy-to-fuselage joint shape; gun troughs positions; Raytheon's instrumentation fairings inapplicable for operational Skyknights.
 - Simplified air intake shape, wheel bay interior and landing gear door interior details.
 - Lack of detail: cockpit interior; tyre tread; various small items missing (flap hinges, trim tab actuators, rudder hinge); no clear parts to imitate navigation lights.

The Sword's kit is surely an improvement over the old one from Matchbox. However, Sword has raised the bar rather high recently and I have expected them to do better both in terms of accuracy and detail. 

6. Reference Data
[1] Douglas F3D Skyknight in Action | Aircraft in Action Series # 10229 | Squadron/Signal Publications, 2012
[2] Douglas F3D Skyknight | Naval Fighters Series # 4 | Ginter Books, 1982
[3] Basic information on the F3D Skyknight in Wikipedia: link
[4] A good photo walk-around: link
My advice is to be careful when looking at photo walk-arounds of museum exhibits. Those in the USS Intrepid Museum and the Flying Leathernecks Museum are ex-Raytheon airframes. They carry a number of modifications not applicable to operational Skyknights.

27 January 2016

U.S. Navy Fire Extinguisher Models

People rarely pay much attention to such a thing as a fire extinguisher: this is just something that has to be handy in certain situations. However, on an air base or on an aircraft carrier deck fire extinguishers are of utmost importance, and therefore they are usually very conspicuous. That means that modellers building a diorama or a vignette can scarcely ignore this relatively unglamorous item.

In this short article I am presenting my 1/72 models of fire extinguishers used by the U.S. Navy. This is by no means an exhaustive list of all fire extinguisher types. I have only built models of those types which I could collect sufficient number of historical photographs for.

1. Portable Fire Extinguisher
This is a portable fire extinguisher of a very basic shape that was in wide use by all branches of the U.S. Military. It was seen on the U.S. Navy aircraft carrier decks throughout the 1940s and 1950s, whereas on shore bases (Navy and Marine Corps Air Stations) it served well into the 1990s.
My model comes from the Fujimi's "Flight Deck Crew & Carrier Tractor" set (cat. # 35001), but I have replaced the hose and the sprayer with scratch-built ones.
Quite recently a new set was released by Aerobonus – "U.S. Navy CO2 PSH-20 Fire Extinguishers" (cat. # 720013). It contains parts to make 6 fire extinguishers, and basing on what I see I would say that it fills the void very nicely.

2. Wheeled Fire Extinguisher
This type of peculiarly shaped wheeled fire extinguisher was in service on the U.S. Navy and Marine Corps Air Stations from the 1960s until the 1980s.
As far as I know it is not kitted yet. I used the photoetched wheels from the "Oxy-acetylene Cart" set by Brengun (cat. # 72011). The agent tanks are scratch-built from plastic and the tubular frame is made of thin metal wire.

3. Wheeled Fire Extinguisher
This type of wheeled fire extinguisher was also in service on the U.S. Navy and Marine Corps Air Stations from the 1960s until the 1980s. Apparently this was the same type of fire extinguisher (or at least a very similar externally) as the one used by the USAF.
Its 1/72 scale model can be found in the "U.S. Aerospace Ground Equipment Set" set manufactured by Hasegawa (cat. # X72-6).
When building my model I only used the tank and the wheels from the Hasegawa set. The tubular frame is scratch-built from metal wire.

4. Wheeled Fire Extinguisher
This type of wheeled fire extinguisher appeared on the U.S. Navy and Marine Corps Air Stations in the 1980s and is still in wide use today. Again, the item appears to be of the same type as the one seen on the USAF air bases.
Its 1/72 scale model can be found in the "U.S. Pilot / Ground Crew Set" set manufactured by Hasegawa (cat. # X72-7).
As before, when building my model I only used the tank and the wheels from the Hasegawa set; everything else is scratch-built from metal wire.

6 January 2016

Grumman F6F-5 Hellcat Model

1. Introduction
1.1. Aircraft
Grumman F6F-5 Hellcat
Carrier-based fighter (information in Wikipedia)
U.S. Navy. VF-12 squadron.
USS Randolph (CV-15), Pacific Theater of Operations, June 1945.

1.2. Story
The story behind my small vignette is very simple. The Hellcat, ready for a routine combat air patrol mission, starts taxiing to the launch position on the USS Randolph's deck. Flight deck crewmen wave to the pilot and wish him good luck, while leaning on a Ford tow tractor.

1.3. Model Kit
F6F-5 Hellcat from Eduard (kit # 7077), 1:72 scale.

2. Kit Overview
Eduard's # 7077 Hellcat is a well-known kit and has been reviewed many times. Here are just two examples of fairly detailed reviews for this kit: link and link.

The engine and cockpit details are very good for the scale; I wish other manufacturers provide us with something on par. I must also commend Eduard on the perfectly engineered way the wings and the horizontal stabilizers are attached to the fuselage: no seams are visible, no putty is required. On the other hand, the drop tank is the "low point" of the kit: its engineering (section of the tank moulded as one piece with two of its supports; halves of braces moulded onto the tank body) leaves no space to avoid visible seams and forces one to scratch-build the whole drop tank bracing arrangement.

3. Construction
3.1. Building
As my model was indented to be presented as taxiing to take off, a couple of important changes had to be made:
 1) Wing flaps had to be lowered, which was done with the help of a resin detail set produced by RES-IM.
 2) Cowl flaps had to be shown in the fully open position.

Additionally, I made the following enhancements:
 3) Scratch-built clear wingtip and fuselage navigation lights, landing light and recognition lights.
 4) Engine exhaust pipes scratch-built from thin metal tubes (syringe needles).
 5) Metal machine gun barrels manufactured by Master-Model.
 6) Main landing gear doors are way too thick; I replaced them with the resin items manufactured by Quickboost.
 7) Some detailing added to the main landing gear legs, including brake line imitation.
 8) Tail landing gear door is incorrect in the kit and was replaced with a scratch-built one.
 9) Various small scratch-built items, including rocket pylons, catapult bridle hooks, aerial, support struts and braces for the drop tank as well as its filler cap.

3.2. Painting & Markings
The Eduard's kit offers good decals. However, I shunned the "toothy grin" VF-27 variant because this is how 99% of Hellcat kits on the Internet are finished; as for the three other variants, I am simply not attracted to "named" planes belonging to famous people.

As a prototype for my model I wanted an F6F-5 covered by good historical photographs, with some hopefully in colour. These criteria are met by the VF-12 / VBF-12 Hellcats from the USS Randolph, and this is the variant that I selected. Among other things, available historical photographs of the Randolph's Hellcats show that their drop tanks were white, their tires had diamond tread, the wings had rocket pylons installed and the fuselage sides were heavily stained.

The paint job is relatively straightforward: the aircraft is Sea Blue overall, the drop tank and the markings are Insignia White. When doing engine exhaust stains one has to remember that they were very light grey (or even off-white) on the Navy's dark blue World War II aircraft (see some period photographs here: linklink).

3.3. Presentation
For me, the presentation of this model was defined by two pre-requisites. Firstly, I wanted to show my Hellcat in its natural habitat, i.e. on a carrier deck. Secondly, I did not want to fold the wing. These conditions leave you with only three options: the aircraft must be either launching or taxiing to launch or landing. I chose the taxiing to launch scenario for my vignette.

This scenario, of course, requires a pilot present in the cockpit. The choice of seated pilot figures is extremely limited in my scale; in fact, I could find (as of early 2015) just one set only – "US Pilots Seated (WW2)" by PJ Productions. Unfortunately, pilot figures in this set are inapplicable for the World War II era as their headgear is totally wrong: they have hard plastic helmets with integrated sun visors which neither of the U.S. Armed Services used before the advent of the 1950s. Navy pilots of the 1940s wore soft leather helmets with two-piece (and later one-piece) aviator goggles.

So, to get myself a historically accurate pilot figure I had to find a new head, and that came from the CMK's set of standing USN pilot figures (# 72115). I also had to reshape the footwear of the PJ's figure as Navy pilots wore neat leather shoes and not some shapeless stuff moulded by PJ. As a reference for painting the pilot figure, I used a number of period color photographs such as these: link, link.

Then, I needed some flight deck crew figures. Here, again, the choice of historically accurate figures is poor. Figures in the well-known Fujimi's set ("Flight Deck Crew & Carrier Tractor") represent the crewmen in attire that came into use in the 1970s: most of the Fujimi's figures wear multi-pocketed vests and all of them wear hard plastic headgear with headsets and one-piece ski-style goggles. Whereas flight deck crewmen of the 1940s wore jeans (classic denims), jerseys or shirts and soft fabric caps (see example here and here). Eventually one of my figures came from the already mentioned CMK's set of standing pilot figures (and was divested of some flight gear) and the other one from the Italeri's "NATO Pilots and Ground Crew" set. Both underwent "head surgery" to achieve historical accuracy.

Ford tractors were widely used on the flight decks of the U.S. Navy carriers since 1943, and historical photographs confirm that they were in service on the USS Randolph too. My model of such tractor (kit # 7007 manufactured by F4Models) is painted Ocean Grey which was the standard colour for the Navy support vehicles at that time.

4. Reference Data
[1] F6F Hellcat in Action | Aircraft in Action Series # 36 | Squadron/Signal Publications, 1979.
[2] F6F Hellcat in Detail & Scale | In Detail & Scale Series # 49 | Squadron/Signal Publications, 1996.
[3] Grumman F6F Hellcat | Aero Detail Series # 17 | Dai Nippon Kaiga Co., 1996.
[4] Basic information on the F6F Hellcat in Wikipedia: link.
[5] Colour footage (authentic, not "colourized") of VF-12 and VBF-12 Hellcats operating from the USS Randolph in 1945. Search for "USS Randolph" on youtube.

5. Notes
Scale modellers should exercise care when using photo walk-arounds of preserved Hellcats. Some of the preserved / restored Hellcats do not accurately represent the wartime machines in all detail. In particular, preserved / restored Hellcats may have the following issues:
 a) Late-type drop tanks, not used by the wartime Hellcats but more common for the Bearcats and Tigercats.
 b) Late-type wheel hubs, not seen on the wartime Hellcats.
 c) Rearranged antennae and external lights (in particular, landing lights and recognition lights).

30 November 2015

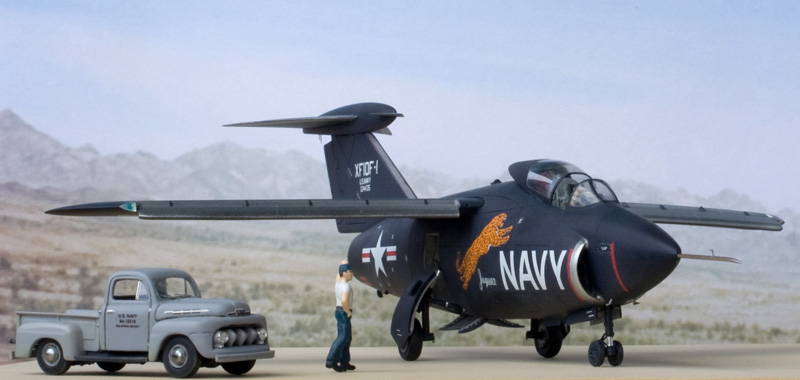
Grumman XF10F-1 Jaguar Model

1. Introduction
1.1. Aircraft
Grumman XF10F-1 Jaguar
Prototype carrier-based swing-wing fighter aircraft (information in Wikipedia)
U.S. Navy. BuNo 124425.
Muroc Dry Lake, USA, May 1952.

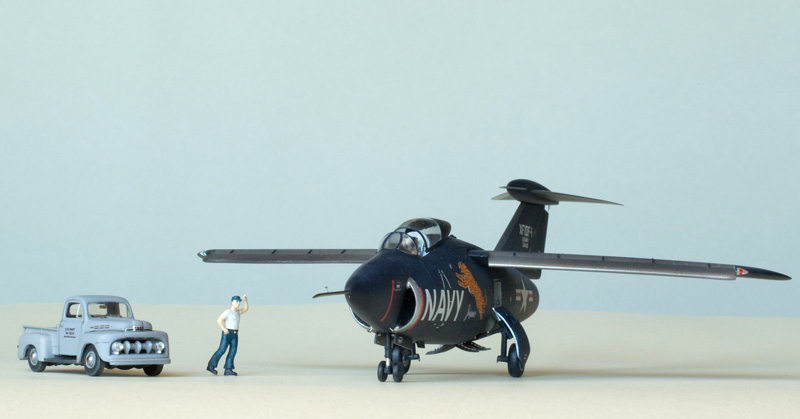
1.2. Story
The story behind my small vignette is as follows. The Jaguar has just landed after completing one of its test flights, all of which took place at Muroc Dry Lake (adjacent to Edwards Air Force Base). A minor problem has developed during the flight (which, according to the pilot, Mr. Corwin Meyer, was entirely normal for the Jaguar – see source [1]), resulting in the aircraft coming to rest slightly further from the usual place. A member of the ground crew nearest to the spot has immediately driven up and is asking the pilot whether any help is required (a tow tractor to the apron, perhaps?).

2. Kit Overview
The XF10F-1 Jaguar from Planet Models (cat. # 171) is a fully resin kit; it comes with a vacu-formed canopy and a set of landing gear legs made of "strengthened" resin. The quality of casting is good, although the fuselage halves of my sample were slightly warped. The resin parts have smooth surface with recessed panel lines which are a bit too deep, but still passable.

The kit presents the XF10F-1 Jaguar in its initial configuration – i.e., original free-floating horizontal stabilizer is in place (swapped for a conventional one prior to the 29th flight), there are no horizontal ventral fins and no speed brakes on the aft fuselage (installed prior to the 17th flight). Keeping this in mind, the accuracy of the kit can be assessed as more or less acceptable out of the box. The cockpit detail is not bad, but the wheel wells are bare. A number of small details seen on the real XF10F-1 are missing, such as T-shaped probes and vertical strakes on the lower forward fuselage. However, the most important issue is the leading edge slats. When the Jaguar is on the ground, its wing is always (at least on all available historical photographs) in the takeoff and landing position, meaning the minimum sweep. And in the minimum sweep position the leading edge slats extend automatically. The kit's wings have no separate slats (which is, alas, true for so many other decent model kits).

There is one other grudge. The manufacturer could have given more thought to the question of joining the kit parts together. The way to glue the wings to the fuselage that the manual suggests is simply unworkable.

3. Construction
3.1. Building
All in all, when building my model I have added the following fully scratch-built items:
- Extended leading edge slats, as my model was indented to be presented sitting on the ground.
- Clear wingtip navigation lights.
- Intake channels interior walls.
- Engine exhaust pipe.
- Landing gear well interior.
- Wiring, tie-down rings, scissor links on the landing gear legs.
- Interior detail on the landing gear doors.
- Nose wheel disks (there should be 8 spokes per wheel disc while the kits offers 6 spokes)
- Pitot tube with plus two small T-shaped probes (adjacent to intake lower lips).
- Small ventral strakes (lower forward fuselage).
- Miscellaneous cockpit detail: some equipment aft of the ejection seat; throttle lever; canopy handles.
Instead of following the unfeasible recommendation on the manufacturer's instruction sheet, I joined all major parts of the model – the fuselage, the wings, the vertical fin and the horizontal stabilator - by means of drilling holes and inserting metal reinforcing rods.

3.2. Painting & Markings
Painting and markings have been done after careful study of historical photographs from the source [1]. The paint job is relatively straightforward: the aircraft is Dark Sea Blue overall with a number of natural metal items (intake lips; wing, vertical fin and stabilator leading edges; wheel wells; landing gear door interior surfaces; mail wheels; pitot tube).
The decal provided in the box is good in quality. It is mostly accurate in regards to the larger items, but less so in regards to various small stencilling. There is one issue, however: contrary to the Planet Models' instruction, the real XF10F-1 did not have the "NAVY" lettering on the upper right wing. There is at least one historic photograph proving this (see the source [1], page 20); I might also add that this conforms to the Navy's standard practice. Most of the Jaguar models on the Internet are inaccurate in this regard, which is a shame. Modellers should pay more attention to historic photographs, less to model kit manufacturers' recommendations.

3.3. Presentation
I am always trying to present an aircraft in its most typical surroundings. For the short-loved XF10F-1 this is definitely the Muroc Dry Lake. The dry lake bed is flat, so my diorama base is just a sheet of plastic which is painted accordingly. It must be noted here that the dry lake bed is a very special surface and is unlike to the sand you see on a beach or in a desert. In normal conditions the dry lake bed is very firm, so that aircraft and vehicles do not bog down, and neither do they generate the clouds of dust when rolling (see some photographs here: photo1photo2photo3).

As my Jaguar is in a "just landed" situation, I needed a pilot in the cockpit. My figure came from the set # 721120 produced by PJ Productions. The pilot's equipment is more or less accurate for the early post-war years; I only had to reshape the footwear of the PJ's figure, as the Navy pilots wore neat leather shoes and not some shapeless stuff molded by PJ.

The rather generic ground crewmen figure came from Italeri's "NATO Pilots and Ground Crew" set # 1246 (actually, it is my home-made customized resin copy since the original Italeri figures are made from polyethylene which is unworkable from the modelling perspective).

The pickup truck model represents a 1951 Ford F-1 (kit # 7020 manufactured by F4Models); it is painted Ocean Grey which was one of the standard colours used for the Navy ground support vehicles at that time. Here is a photographic proof (link) that Ford F-1 pickup trucks were indeed operated by the U.S. Navy.
 

4. Reference Data
[1] Grumman XF10F-1 Jaguar | Naval Fighters Series # 26 | Ginter Books, 1993.
[2] Basic information on the XF10F Jaguar in Wikipedia: link.

5. Notes
You can often see modellers declare that they won't build resin model kits, implying that resin is the reason for that self-abstention. They list a variety of reasons; one of those reasons is that supposedly the resin kits would warp and deform with time. Well, I have completed this model of the XF10F-1 Jaguar in November 2015; now it is November 2019. Exactly four years have passed, and the three landing gear legs, made entirely from resin (no metal inside them), that support the weight of the full-resin model, show no sign of deformation. The whole model today looks exactly the same as when it was finished.

15 October 2015

E-1B Tracer – RVHP Conversion Set Review

1. Introduction
Aircraft: Grumman E-1B Tracer
Model kit manufacturer / country: RVHP / Czech Republic
Scale: 1:72
Catalogue number: 7293
Release time: probably late 1990s

Basic information on the E-1 Tracer is available in Wikipedia (link) and will not be repeated here.

2. Kit
This is in fact a conversion set and not a full kit. It is intended to convert the S-2 Tracker model produced by Hasegawa (a very old one, first introduced in the 1970s) into the E-1B AEW variant.

2.1. Box
The box is compact (23 x 14 x 4 cm) and extremely sturdy. There is no other packaging though, and resin pats are left to rattle inside the box.

2.2. Instruction
Instruction is provided on one black & white A4 sheet. Assembly guidelines are given in a text-only form. Very little information on painting is supplied.

2.3. Resin Items
All parts are cast from pale cream resin. At first glance, the resin as such looks nice, but the quality of surface finish is in fact very poor: the parts are uneven in places and have multiple scratches as if they have been sandpapered (apparently, the manufacturer neglected to prepare the master kit surfaces properly before casting). The two parts comprising the radome do not fit together, leaving a wide gap. The fuselage halves diverge when aligned.
While the quality of parts can be assessed as poor, the accuracy and geometry is, unfortunately, even worse. The most characteristic feature of the Tracer, its radome, is fatally flawed. See for yourself on my comparison pictures, where the RVHP's parts are put against some historical photographs and the Google's satellite imagery of a surviving E-1B. The shape of the real Tracer radome is not only different in all aspects (planform, side view, front view), it is also much more intricate than the simple tear-drop / egg-shaped thing designed by RVHP
Other issues of this set comprise:
 - Total lack of small parts to make the radome support struts (5 in total), several Tracer-specific fuselage air scoops and smaller antennae.
 - Absence of accurate panel lines on the fuselage and the radome.
 - Absence of the vents on the radome underside and several smaller air inlets on the fuselage.
 - Simplified surface detail on the horizontal and vertical stabilizers.

One has also to keep in mind that the Hasegawa's S-2 Tracker kit, which is supposed to serve as a basis for this Tracer conversion, is itself very old, has raised panel lines and offers very austere detailing. Given this, the project of building something resembling an accurate model of the E-1B would require many months of dedicated and meticulous work that, among other things, will include scratch-building the radome – thus making obtaining the Czech conversion set scarcely worthwhile.

All in all, the RVHP's set leaves an impression that it has been designed basing on some sketchy drawings (from an old book or a magazine) rather than on any photographs of the real aircraft in question. Actually, this may well be the case if the set was created in the pre-Internet era by someone who had no chance to visit the U.S. and photograph / measure one of the very few surviving Tracers stored there.

3. Decal
One decal option is provided for the following aircraft:
 - BuNo 148921 / NP015. U.S. Navy, squadron VAW-111, USS Hancock (CV-19), 1973.
Basing on the historical photographs, the decal sheet has the following inaccuracies:
1) The exact shape and size of the bat artwork is questionable, as the only available historical photograph that proves its existence is taken at a rather oblique angle. It could be surmised that this artwork was a one-of-kind example specific for BuNo 148921, as historical photographs of other VAW-111 Tracers that are currently available do not exhibit any radome artwork whatsoever.
2) Inaccurate font of the vertical stabilizer "NP" code: there should be no cut angles on the P's.
3) Inaccurate font of the "8921" BuNo and the "015" modex: all characters should have 60° angles (not 45°).
4) Inaccurate BuNo cut-out on the vertical stabilizer maroon trim.
5) Inaccurate black arrow shapes: they should have straight, not curved sides.

What we see here is a decal that was apparently created basing on a drawing in a book (namely, USN Aircraft Carrier Air Units Volume 3 by Duane Kasulka, Squadron / Signal Publications, 1988) and not on historical photographs.

4. Alternatives & Aftermarket
As of October 2015 there is only one full kit of the Tracer on the market – the one issued by Mach2 (# 7229 / GP029). As can be seen from kit reviews (see link), the Mach2's kit has the same grossly inaccurate radome shape as does the RVHP's conversion set. A very old vacu-formed conversion set produced by Falcon (# 4600), unsurprisingly, also shares the egg-shaped radome with the RVHP and Mach2 offerings.

No aftermarket is made specifically for the Tracer. However, there is an R-1820 engine set by QuickBoost (# 72059) that is certainly applicable. In addition, there are two photoetched detail sets made by Eduard (# 72267 and # 72268) that are intended for the S-2 Tracker; certain parts from these two sets could be also of use.

5. Conclusion
Pro:
 - Nothing.
Contra:
 - Totally inaccurate radome shape.
 - Very poor quality of surface finish.
 - Poor fit of parts.
 - Poor surface detail: no proper panel lines on the fuselage and radome, no imitation of vents, inlets, hatches and lights on the fulselage.
 - Total lack of the Tracer-specific small parts: radome support struts, air scoops, various antennae.
 - Inaccurate decal.
 - High price (~$52 in 2005 at Hobbyshop.cz).

The conclusion is, therefore, as follows: we will have to wait until some manufacturer comes up with a new E-1 Tracer kit – and, hopefully, with an accurate one.

6. Reference Data
[1] Basic information on the E-1 Tracer in Wikipedia: link
[2] Good photo walk-arounds: linklink
[3] Some useful notes by Tommy H. Thomason: link
[4] S2F Tracker in Action | Aircraft in Action Series # 100 | Squadron/Signal Publications, 1990
[5] E-1B Tracer Standard Aircraft Characteristics sheet by NAVAIR (see link in source [1]).
[6] An example of flawed E-1 Tracer drawings: link